A bolt gun Revisited
-
metalhead

- AA Poster

- Posts: 270
- Joined: Mon Nov 28, 2005 4:28 pm
- Location: Adna
A bolt gun Revisited
7mm BR TPP.........Thoedore...Pearson...Perry
McAlice you may remeber this one. It's for the new guys to see what they have missed and have asked about recently. Grenz....You can stay out of this one as you did the Hi Jack of the thread as usual like 4 years ago.
If you don't like it, cool, you do not have to comment....Like I said, it's for the new guys starting out in the Highpower game to see what really can be done, and mostly to mess with the freakin' Marv Haters.
Figure 1 shows the set up used to true the receiver which for this project was a Remington Model 700 Titanium. The action is being held in a Pratt Burnerd six jaw “Set Rite” adjustable scroll chuck. A precision mandrel was inserted into the action and a live center in the tailstock keeps the mandrel level. Using a Brown and Sharpe dial indicator graduated to 50 millionths of an inch, the Set Rite chuck is carefully adjusted so that the mandrel dials in perfectly thus assuring that the centerline of the action is held in a true concentric and level state.
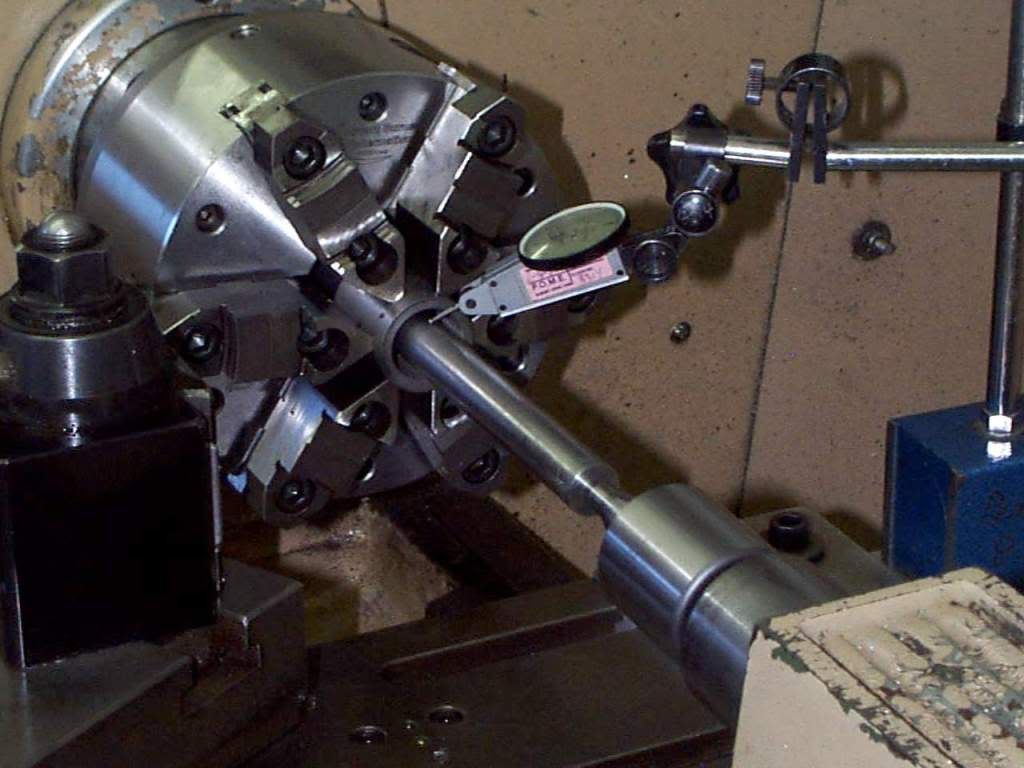
Figure 2 shows the trued receiver. The recoil shoulders have been re-cut for a minimum cleanup and the face of the receiver has also had a minimum clean-up cut done. The 1 & 1/6 x 16 internal threads of the receiver have been picked with a single point threading tool and have been enlarged slightly for a minimum clean-up.
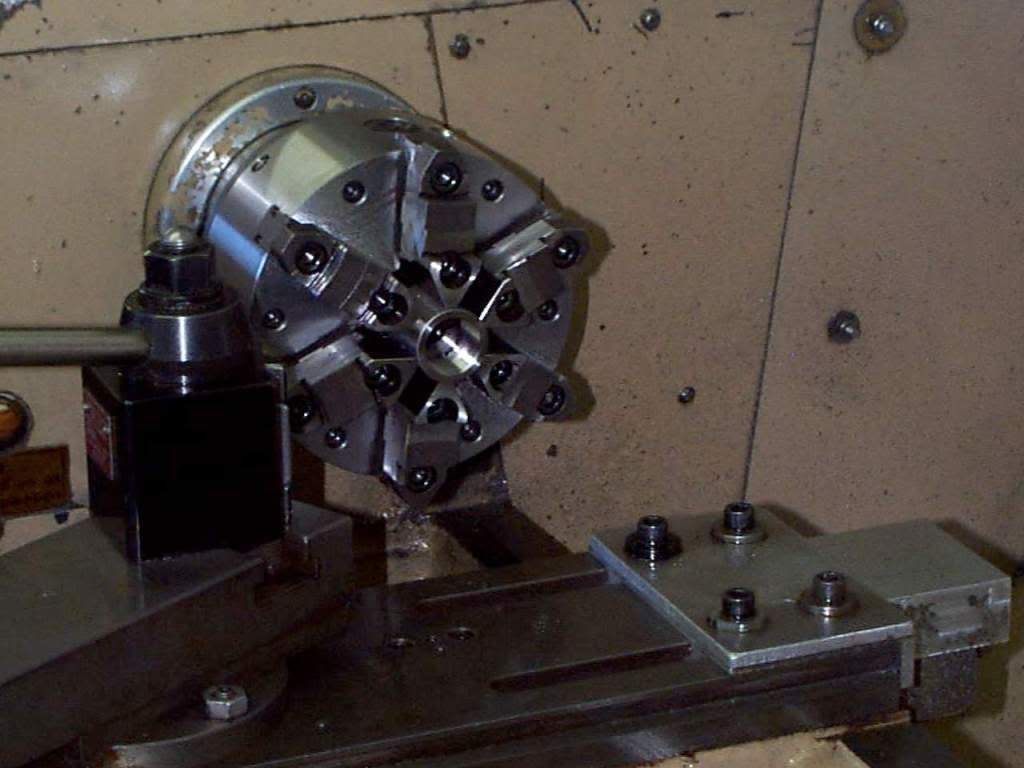
Figure 3 shows the bolt clamped into the precision bolt truing fixture. The fixture is held in a 10” diameter 4 jaw chuck and dialed dead nuts true. Once again I take a minimum clean-up cut across the face of the bolt nose and turn the bolt nose itself to a .690 diameter. I then set up a small carbide boring bar and carefully make a minimum clean up cut on the back of the locking lugs on the bolt. Now all contact surfaces are true and square to the centerline of the bolt body.
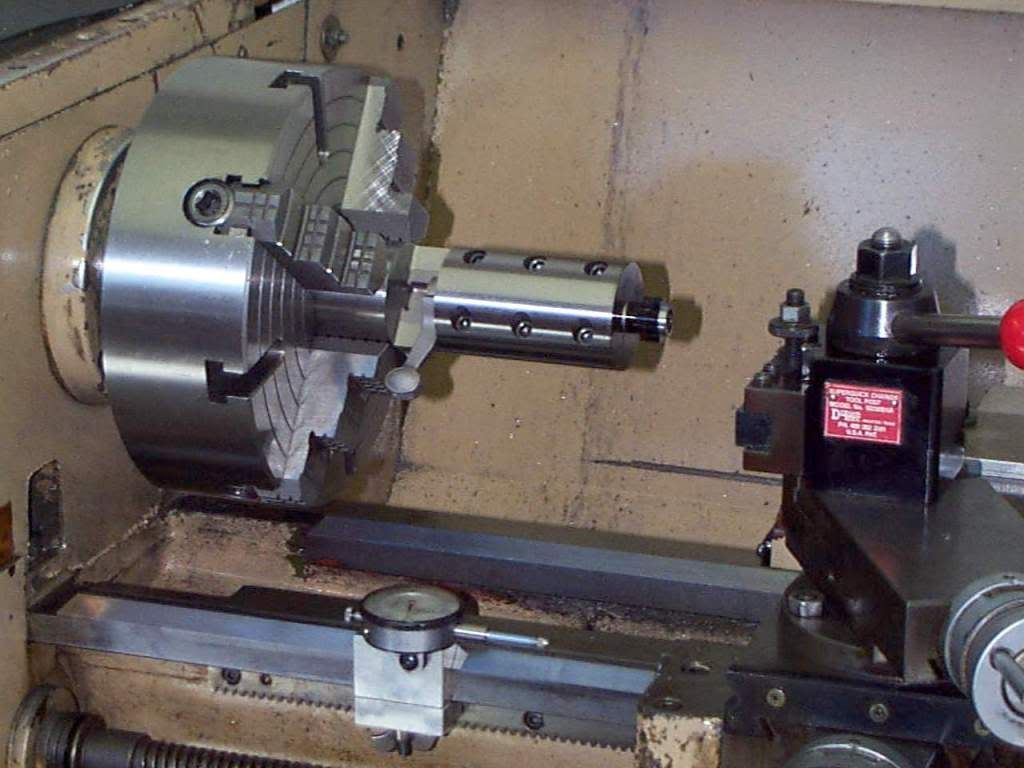
Figure 4 shows the stripped Anschutz 5025 trigger housing being set up on the milling machine. Using a dial indicator, the housing is leveled in the vise and then clamped securely to the angle block with a C clamp. The Anschutz trigger housing is a rough cast part that needs the mounting surfaces cleaned up to insure a precision fit.
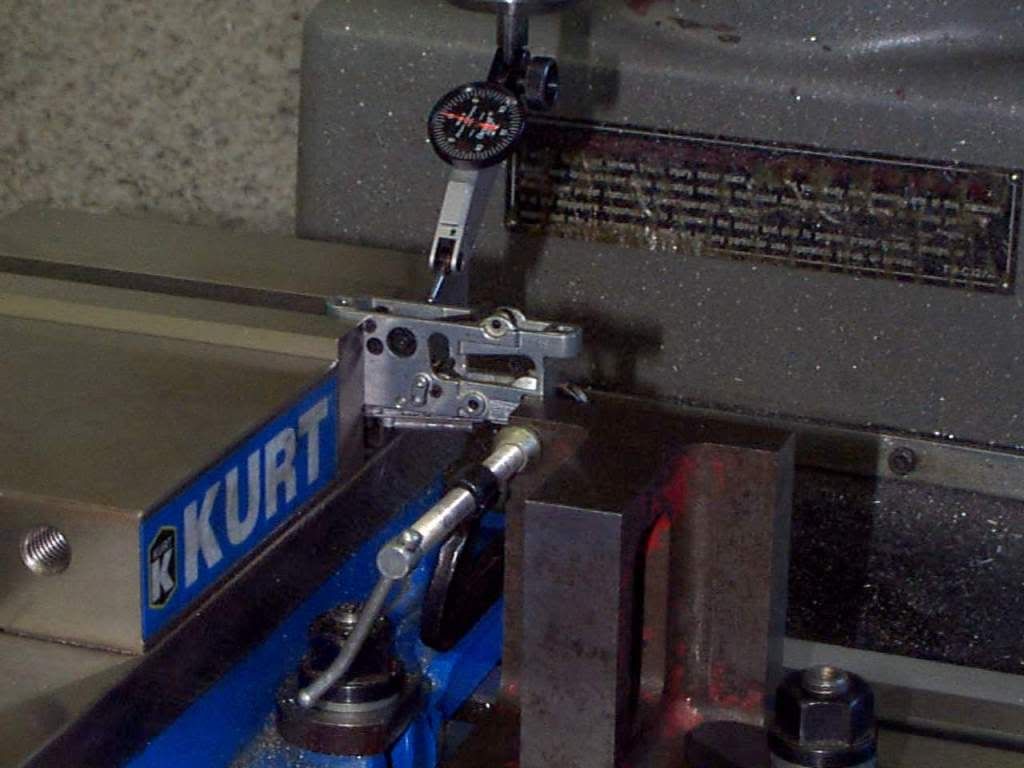
Figure 5 shows the 5025 trigger housing after the milling cuts have been made. You will also notice that the rear mounting hole has been opened up to accept the ¼ - 28 rear guard screw on the Remington 700 action. You will also notice the .085 deep step cut made on the rear of the trigger housing.
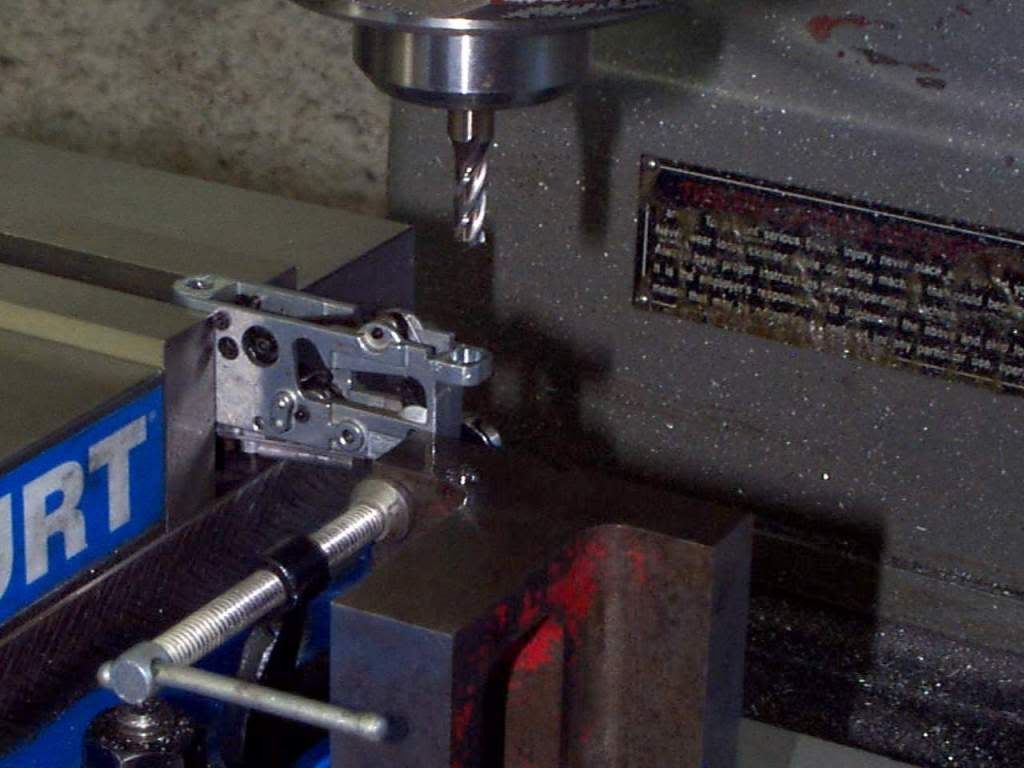
Figure 6 shows the 5025 trigger housing flipped over and clamped to the front mounting surface that was cut in the Figure 5 set up. The task here is to cut a 3/8” counter bore and relieve the trigger housing so that the rear guard screw stanchion may be installed.
Sorry...Figure six seems to have been lost. Ok Grenz....Chime in here if you like!
Figure 7 shows the M-700 receiver being set up to machine the bottom of the action to accept the Anschutz trigger. The action is clamped in a 3 jaw upright chuck and dialed in so that it is straight and level. An angle plate and another C clamp help stabilize the receiver for machining. A small screw jack was also used to keep the action level during machining.
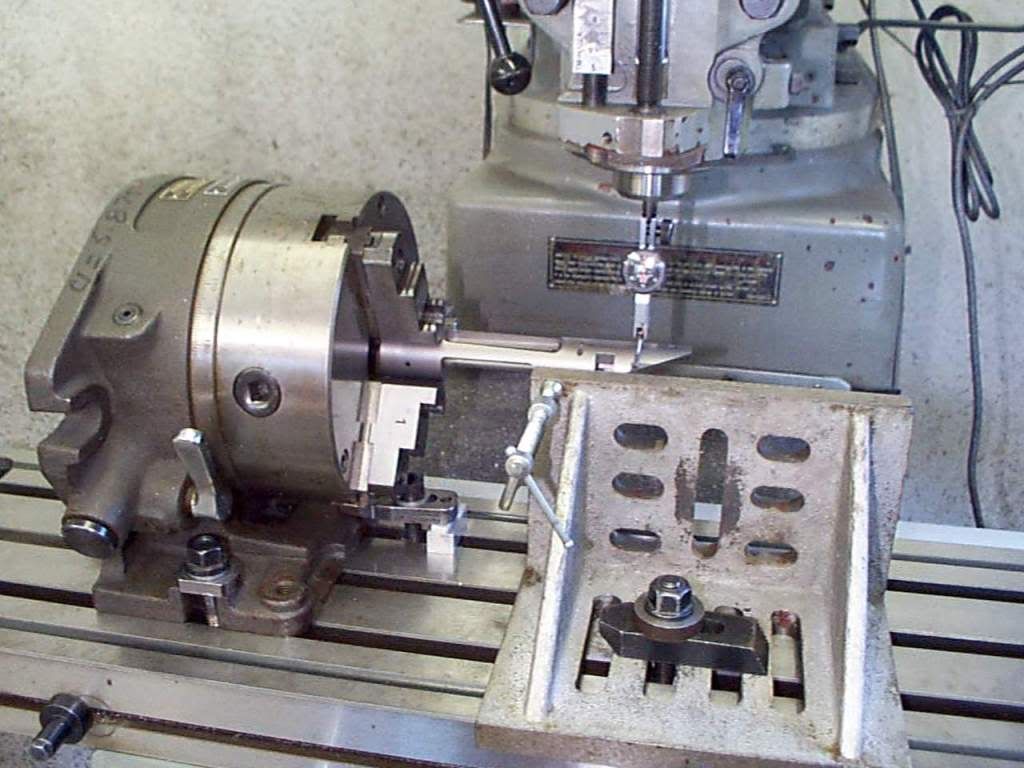
Figure 8 shows the Anschutz 5025 trigger mounted onto the Remington Model 700 Titanium action. Notice the rear guard screw stanchion at the rear of the trigger housing. It’s just basically a ¼ - 28 male / female part that holds the trigger housing to the receiver and has a ¼ - 28 threaded hole for the rear trigger guard screw.
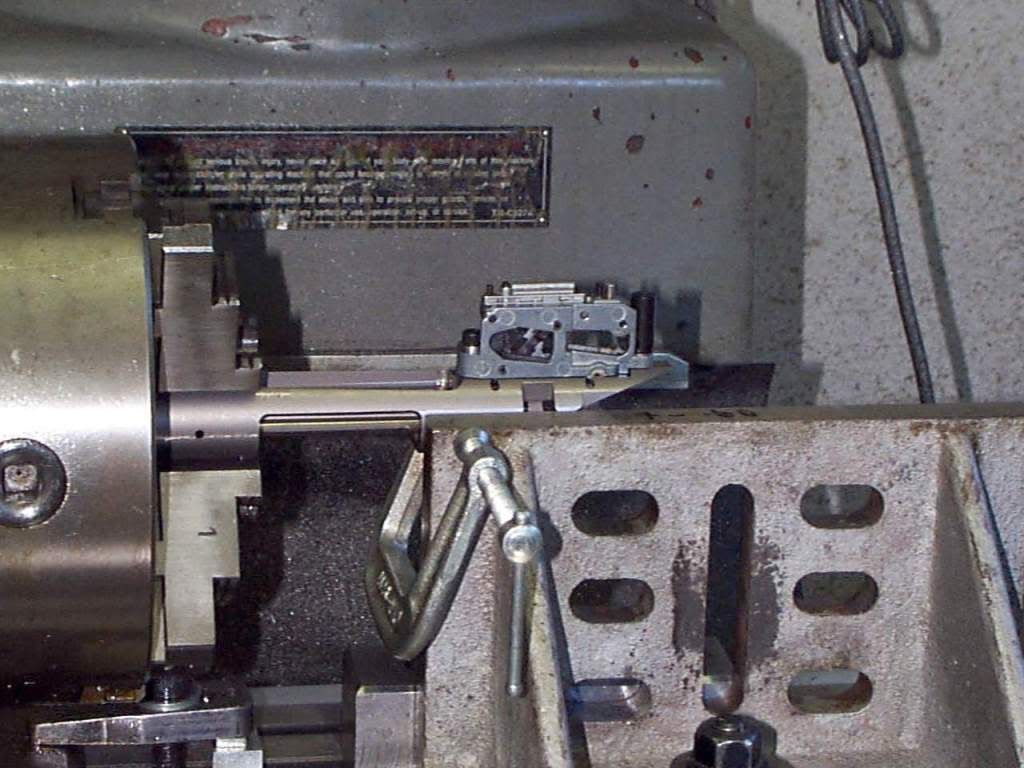
Figure 9 shows the pocket being milled for the new bolt stop. Since you lose the factory bolt stop with this trigger installation, a lever style bolt stop from Nesika Bay Precision is installed into the left rear of the action.
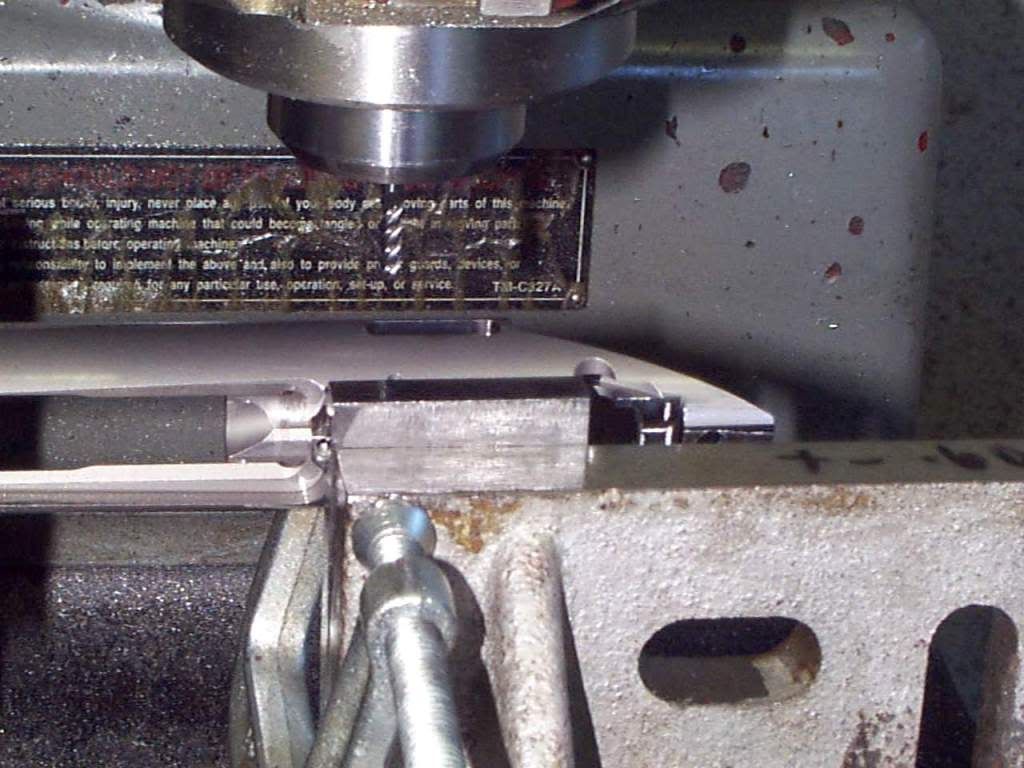
Figure 10 shows how the barrel threading and chambering operations are set up. Using a set of DELTRONIC TP 25 test pins, the barrel can dialed in to 0.0000 to .0001 TIR ( Total Indicator Reading ) . One must understand that the internal diameter of the barrel is never perfectly concentric with the outside contour of the barrel. So by just chucking up on the outside contour, this will not insure that the bore is running true when you start threading and chambering. By using the DELTRONIC pins, which are graduated in increments of .0001, you can select the pin that perfectly fits the internal diameter of the barrel and then dial in the pin so that you know the bore of the barrel is running true.
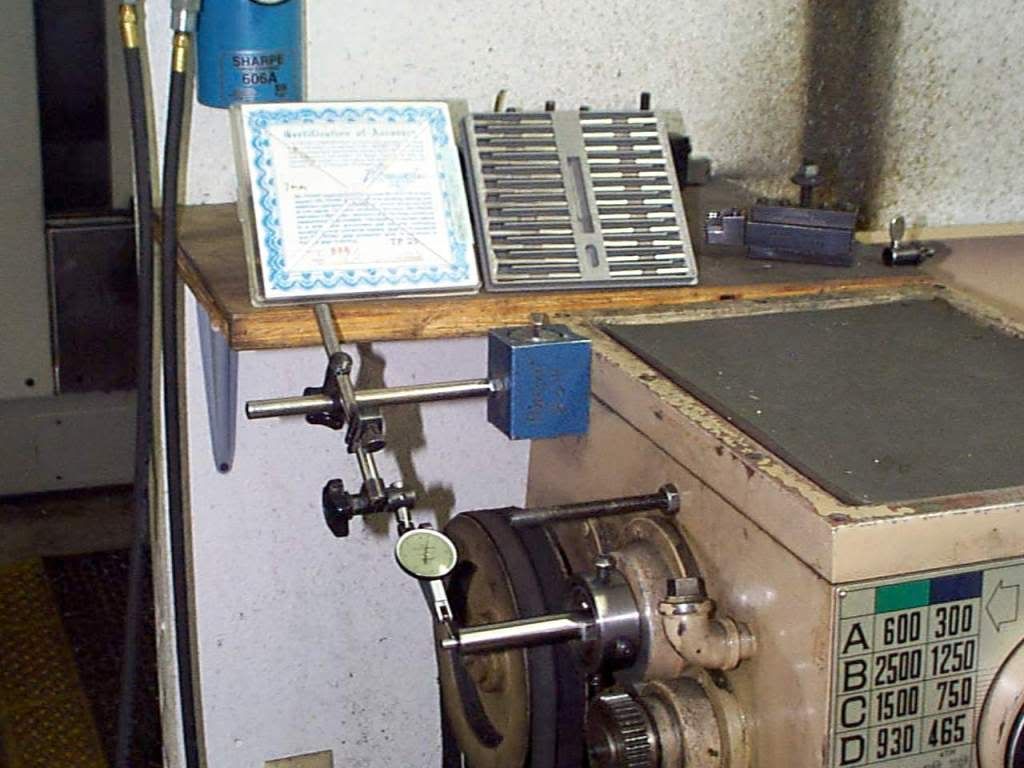
Figure 11 shows the use of the DELTRONIC pins to dial in the breach end of the barrel prior to threading and chambering.
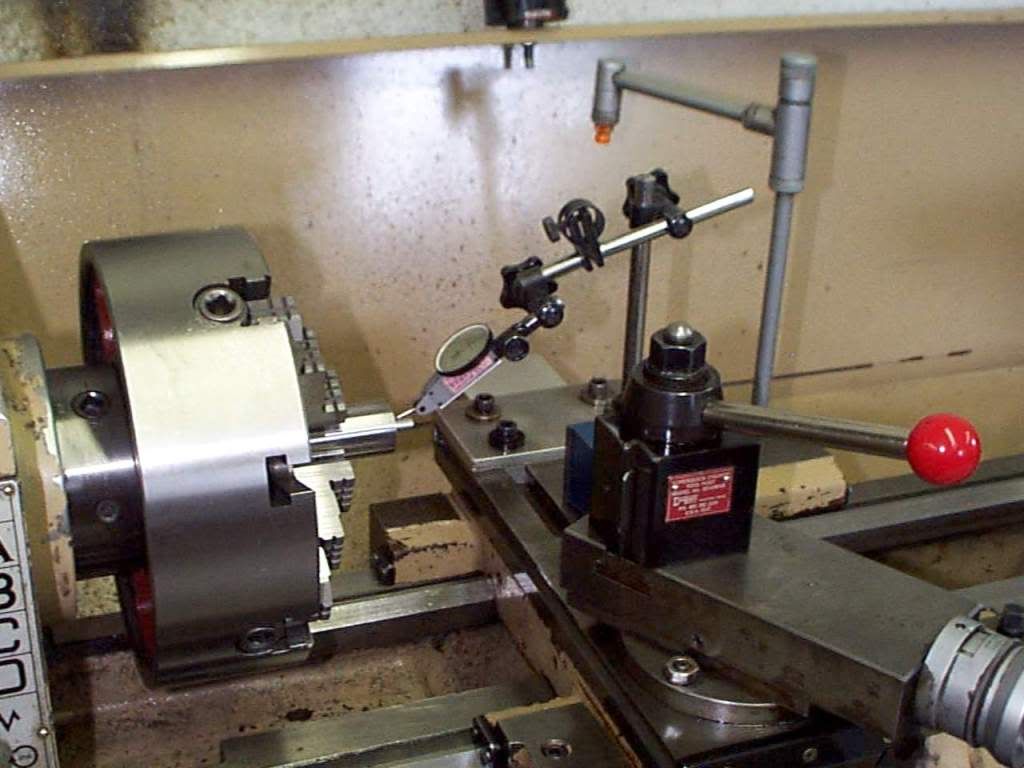
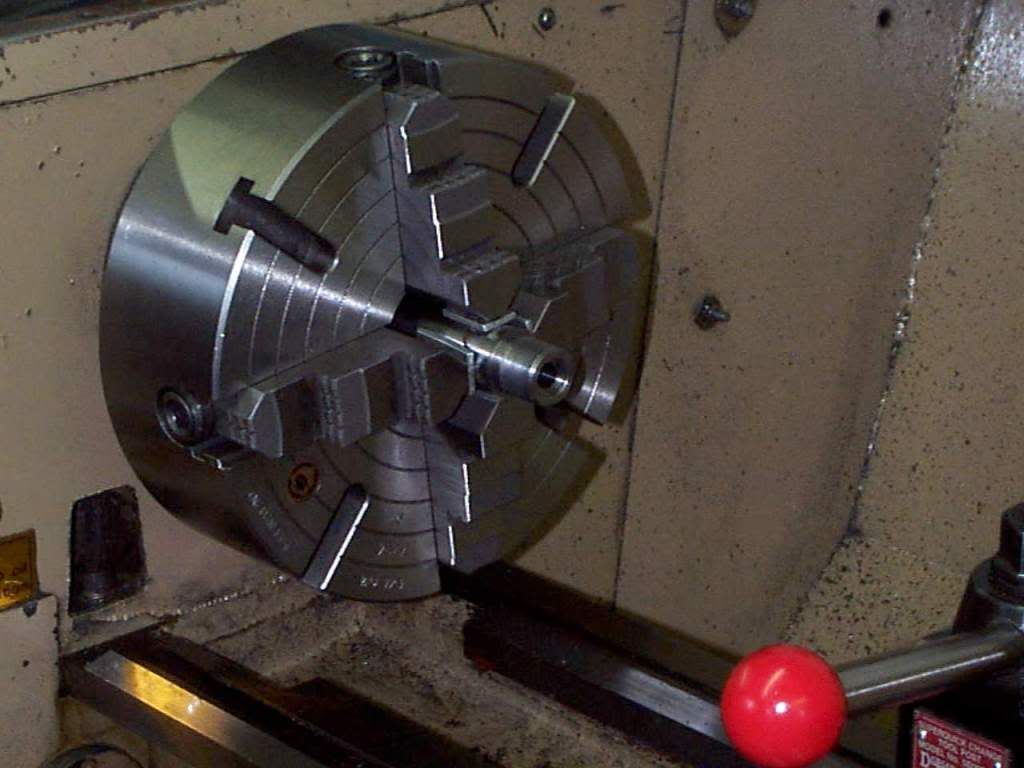
Figure 12 shows the finished threaded and chambered barrel shank.
Now...wasn't that nice?
 Now doesn't this just piss you Marv Haters off big time?
I thought so. Tooo Baaddd.... Roll Tide!
McAlice you may remeber this one. It's for the new guys to see what they have missed and have asked about recently. Grenz....You can stay out of this one as you did the Hi Jack of the thread as usual like 4 years ago.
If you don't like it, cool, you do not have to comment....Like I said, it's for the new guys starting out in the Highpower game to see what really can be done, and mostly to mess with the freakin' Marv Haters.
Figure 1 shows the set up used to true the receiver which for this project was a Remington Model 700 Titanium. The action is being held in a Pratt Burnerd six jaw “Set Rite” adjustable scroll chuck. A precision mandrel was inserted into the action and a live center in the tailstock keeps the mandrel level. Using a Brown and Sharpe dial indicator graduated to 50 millionths of an inch, the Set Rite chuck is carefully adjusted so that the mandrel dials in perfectly thus assuring that the centerline of the action is held in a true concentric and level state.
Figure 2 shows the trued receiver. The recoil shoulders have been re-cut for a minimum cleanup and the face of the receiver has also had a minimum clean-up cut done. The 1 & 1/6 x 16 internal threads of the receiver have been picked with a single point threading tool and have been enlarged slightly for a minimum clean-up.
Figure 3 shows the bolt clamped into the precision bolt truing fixture. The fixture is held in a 10” diameter 4 jaw chuck and dialed dead nuts true. Once again I take a minimum clean-up cut across the face of the bolt nose and turn the bolt nose itself to a .690 diameter. I then set up a small carbide boring bar and carefully make a minimum clean up cut on the back of the locking lugs on the bolt. Now all contact surfaces are true and square to the centerline of the bolt body.
Figure 4 shows the stripped Anschutz 5025 trigger housing being set up on the milling machine. Using a dial indicator, the housing is leveled in the vise and then clamped securely to the angle block with a C clamp. The Anschutz trigger housing is a rough cast part that needs the mounting surfaces cleaned up to insure a precision fit.
Figure 5 shows the 5025 trigger housing after the milling cuts have been made. You will also notice that the rear mounting hole has been opened up to accept the ¼ - 28 rear guard screw on the Remington 700 action. You will also notice the .085 deep step cut made on the rear of the trigger housing.
Figure 6 shows the 5025 trigger housing flipped over and clamped to the front mounting surface that was cut in the Figure 5 set up. The task here is to cut a 3/8” counter bore and relieve the trigger housing so that the rear guard screw stanchion may be installed.
Sorry...Figure six seems to have been lost. Ok Grenz....Chime in here if you like!
Figure 7 shows the M-700 receiver being set up to machine the bottom of the action to accept the Anschutz trigger. The action is clamped in a 3 jaw upright chuck and dialed in so that it is straight and level. An angle plate and another C clamp help stabilize the receiver for machining. A small screw jack was also used to keep the action level during machining.
Figure 8 shows the Anschutz 5025 trigger mounted onto the Remington Model 700 Titanium action. Notice the rear guard screw stanchion at the rear of the trigger housing. It’s just basically a ¼ - 28 male / female part that holds the trigger housing to the receiver and has a ¼ - 28 threaded hole for the rear trigger guard screw.
Figure 9 shows the pocket being milled for the new bolt stop. Since you lose the factory bolt stop with this trigger installation, a lever style bolt stop from Nesika Bay Precision is installed into the left rear of the action.
Figure 10 shows how the barrel threading and chambering operations are set up. Using a set of DELTRONIC TP 25 test pins, the barrel can dialed in to 0.0000 to .0001 TIR ( Total Indicator Reading ) . One must understand that the internal diameter of the barrel is never perfectly concentric with the outside contour of the barrel. So by just chucking up on the outside contour, this will not insure that the bore is running true when you start threading and chambering. By using the DELTRONIC pins, which are graduated in increments of .0001, you can select the pin that perfectly fits the internal diameter of the barrel and then dial in the pin so that you know the bore of the barrel is running true.
Figure 11 shows the use of the DELTRONIC pins to dial in the breach end of the barrel prior to threading and chambering.
Figure 12 shows the finished threaded and chambered barrel shank.
Now...wasn't that nice?
Now doesn't this just piss you Marv Haters off big time? I thought so. Tooo Baaddd.... Roll Tide!
Last edited by metalhead on Sat Oct 29, 2011 9:18 pm, edited 1 time in total.
-
bwilliams
- B Poster

- Posts: 82
- Joined: Tue Sep 15, 2009 8:16 pm
Re: A bolt gun Revisited
impressive!
Thanks for sharing.
Brett
Thanks for sharing.
Brett
-
Jerry G
- Uber Master Poster

- Posts: 2746
- Joined: Wed Apr 12, 2006 2:34 pm
- Location: Casa Grande, AZ
Re: A bolt gun Revisited
I don't have a clue why you mentioned me Marv. I don't recall ever trying to piss you off.
-
Evelio Mc Donald

- Sponsor

- Posts: 779
- Joined: Thu Feb 23, 2006 9:05 pm
- Location: Wimberley, Texas
Re: A bolt gun Revisited
Marv.
I really love those pictures and explanation of the process, this is what I expect from a perfectionist, and what I consider a master machinist like you, I am always jelous of your workmanship. Now I have a question for you which it has been and argument with some of my fellow shooters.
The process to re-work the bolt lugs looks great to me, also the process to blue print the action, my problem is the stack up of tolerances between the OD of the bolt, and ID of the action, and the bolt face being perfectly concentric with the chamber, and the actual bore of the barrel.
Now this is the real question, and would like your thruth opinion. I think that the bolt face should be faced off after it has been installed in the mating action. PTG makes a tool that screws againts the face of the action, and the cutter shaft is spring loaded, which will push the bolt againts the locking lugs, and then you rotate the cutter shaft to make a minimum cut on the face of the bolt, which then it will make the bolt face perfectly concentric with the face of the action, where the barrel will buck up againts, and should really make all 3 components as concentric with each other as possible.
Please realize that I am not criticising your process, which is practically the way I do it, except there is still a doubt in my mind, about doing the action and bolt separetly. I have not used the PTG tool yet, but I am thinking of buying one.
Your opinion is greatly appreciated.
Regards.
Evelio.
PS. I hope you don't take this posting wrong, I have asked the same question to other gunsmiths, and their answers all vary, I will respect yours.
I really love those pictures and explanation of the process, this is what I expect from a perfectionist, and what I consider a master machinist like you, I am always jelous of your workmanship. Now I have a question for you which it has been and argument with some of my fellow shooters.
The process to re-work the bolt lugs looks great to me, also the process to blue print the action, my problem is the stack up of tolerances between the OD of the bolt, and ID of the action, and the bolt face being perfectly concentric with the chamber, and the actual bore of the barrel.
Now this is the real question, and would like your thruth opinion. I think that the bolt face should be faced off after it has been installed in the mating action. PTG makes a tool that screws againts the face of the action, and the cutter shaft is spring loaded, which will push the bolt againts the locking lugs, and then you rotate the cutter shaft to make a minimum cut on the face of the bolt, which then it will make the bolt face perfectly concentric with the face of the action, where the barrel will buck up againts, and should really make all 3 components as concentric with each other as possible.
Please realize that I am not criticising your process, which is practically the way I do it, except there is still a doubt in my mind, about doing the action and bolt separetly. I have not used the PTG tool yet, but I am thinking of buying one.
Your opinion is greatly appreciated.
Regards.
Evelio.
PS. I hope you don't take this posting wrong, I have asked the same question to other gunsmiths, and their answers all vary, I will respect yours.
Evelio
-
metalhead
- AA Poster
- Posts: 270
- Joined: Mon Nov 28, 2005 4:28 pm
- Location: Adna
Re: A bolt gun Revisited
Good afternoon Evelio. I hear what you are saying and I fully understand the question. My answer would be that I fully trust a precision machine tool to be far more accurate when set up correctly as compared to a hand operated device of any kind.
You and I both are fully aware that Remington factory bolts vary in diameter. It is what it is. Also as you are so fully aware, the internal diameter of the receiver also varies from gun to gun. It's my opinion that what is really critical is how much movement of the rear end of the bolt is noticed when when the bolt is closed on an empty chamber. If you can grab the rear of the bolt by the shourd and it has any significant play to it, this is what can lead to disappointing accuracy and even accidental discharges of the firearm.
My position on the matter is that if you dial in the internal diameter of the receiver as shown it the photos and recut the two recoil shoulders, lightly clean up the face of the action, and then pick up the internal threads with a single point tool and recut them for a minimum cleanup then all related surfaces on the receiver are dead nuts true to one another.
As far as the bolt truing goes, you can plainly see the hell for stout bolt truing fixture that I made. Cheap ? No. Can you go buy one of this quality? Again, No. When the bolt is dialed in, again dead nuts true, and you lightly clean up the surfaces in relation to the theoretical centerline of the bolt body and turn the bolt nose to .690 diameter, it accomplishes the best of all worlds when doing a precision re-barrel. Again, just my humble opinion. As you might expext, I always check the bolt face with an indicator to insure that it is indeed square and true to the theoretitcal centerline of the bolt body.
Over the years, I have indeed removed the extractors, (both rivited and snap in), and recut the bolt face with a specially ground small carbide boring bar if needed. However, this just costs the customer more money when the extractors have to be replaced. Don't even get me started on the rivited extractors. Geeze, I have all of the tooling, the riveted extractor anvils and such to perform these tasks but it has been my experience that this is a step that is generally not needed due to the bolt face coming from the factory is usually being very close to, if not dead nuts square, with the centerline bolt body.
When threading and chambering the new barrel, holding the .155 deep counter bore to a diameter of .6905 to .6910 insures a very precise fit of the bolt nose and the barrel counter bore. Then buy keeping the chamber depth at the minimum tolerance when the "go" gage closes with a .001 or less clearance, this will insure that the recoil lugs on the bolt will be in a super precise state of full contact with the recoil shoulders in the action when a round is chambered.
In my opinion, again, for what's that worth, any aftermarket hand operated tooling simply cannot insure such precise metal to metal contact. Many guys build very accurate Remington 700 rifles by simply using a 1 & 1/16 - 16 hand tap to clean up the internal threads then use some lapping compound and some considerable elbow grease to "mate" the contact surfaces of the receiver and the bolt. I simply choose to put my faith and skills in a machine tool as opposed to something that is hand held and the issue about the small area of the bolt face not being perfectly square, is a non-issue. Really, how is the average gargae Smith going to be able to tell if the bolt face is .0001 or .001 out of square unless he has a precision bolt fixture set up nice and true? Simple answere is, he or she can't.
Evelio, to be perfectly honest, I think that this type of tooling is intended for those "gunsmiths" that do not posses the elevated machinist skills that someone such as yourself has in his arsenal. Just a gimmic to make a few more bucks off of. Not saying there's anything wrong with that, just spend your bucks wisely my friend. Again, just my humble opinion.
Hey Pal, sorry for the "run-on" sentences and such, but I have recently been informed up in here that I am just an "illiterate SOB". As they say, It is what it is and considering the source, it don't bother me one bit. They all think that this gun thing is my primary source of income. Nothing could be farther from the truth. I do it because I have the skils, the machines, and the spare time. Jerry, you have not upset me. It's just in your nature to lead a technical thread off in some other direction than the original post had intended. No harm, no foul.
Great game today from the Houston Texans. Geeze, My Seahawks however haveto be the best darn Community College team in the entire National Footbal Leauge !
Cheers Evelio....Marv ... Let me know what you experience with Kiff's tooling.
You and I both are fully aware that Remington factory bolts vary in diameter. It is what it is. Also as you are so fully aware, the internal diameter of the receiver also varies from gun to gun. It's my opinion that what is really critical is how much movement of the rear end of the bolt is noticed when when the bolt is closed on an empty chamber. If you can grab the rear of the bolt by the shourd and it has any significant play to it, this is what can lead to disappointing accuracy and even accidental discharges of the firearm.
My position on the matter is that if you dial in the internal diameter of the receiver as shown it the photos and recut the two recoil shoulders, lightly clean up the face of the action, and then pick up the internal threads with a single point tool and recut them for a minimum cleanup then all related surfaces on the receiver are dead nuts true to one another.
As far as the bolt truing goes, you can plainly see the hell for stout bolt truing fixture that I made. Cheap ? No. Can you go buy one of this quality? Again, No. When the bolt is dialed in, again dead nuts true, and you lightly clean up the surfaces in relation to the theoretical centerline of the bolt body and turn the bolt nose to .690 diameter, it accomplishes the best of all worlds when doing a precision re-barrel. Again, just my humble opinion. As you might expext, I always check the bolt face with an indicator to insure that it is indeed square and true to the theoretitcal centerline of the bolt body.
Over the years, I have indeed removed the extractors, (both rivited and snap in), and recut the bolt face with a specially ground small carbide boring bar if needed. However, this just costs the customer more money when the extractors have to be replaced. Don't even get me started on the rivited extractors. Geeze, I have all of the tooling, the riveted extractor anvils and such to perform these tasks but it has been my experience that this is a step that is generally not needed due to the bolt face coming from the factory is usually being very close to, if not dead nuts square, with the centerline bolt body.
When threading and chambering the new barrel, holding the .155 deep counter bore to a diameter of .6905 to .6910 insures a very precise fit of the bolt nose and the barrel counter bore. Then buy keeping the chamber depth at the minimum tolerance when the "go" gage closes with a .001 or less clearance, this will insure that the recoil lugs on the bolt will be in a super precise state of full contact with the recoil shoulders in the action when a round is chambered.
In my opinion, again, for what's that worth, any aftermarket hand operated tooling simply cannot insure such precise metal to metal contact. Many guys build very accurate Remington 700 rifles by simply using a 1 & 1/16 - 16 hand tap to clean up the internal threads then use some lapping compound and some considerable elbow grease to "mate" the contact surfaces of the receiver and the bolt. I simply choose to put my faith and skills in a machine tool as opposed to something that is hand held and the issue about the small area of the bolt face not being perfectly square, is a non-issue. Really, how is the average gargae Smith going to be able to tell if the bolt face is .0001 or .001 out of square unless he has a precision bolt fixture set up nice and true? Simple answere is, he or she can't.
Evelio, to be perfectly honest, I think that this type of tooling is intended for those "gunsmiths" that do not posses the elevated machinist skills that someone such as yourself has in his arsenal. Just a gimmic to make a few more bucks off of. Not saying there's anything wrong with that, just spend your bucks wisely my friend. Again, just my humble opinion.
Hey Pal, sorry for the "run-on" sentences and such, but I have recently been informed up in here that I am just an "illiterate SOB". As they say, It is what it is and considering the source, it don't bother me one bit. They all think that this gun thing is my primary source of income. Nothing could be farther from the truth. I do it because I have the skils, the machines, and the spare time. Jerry, you have not upset me. It's just in your nature to lead a technical thread off in some other direction than the original post had intended. No harm, no foul.
Great game today from the Houston Texans. Geeze, My Seahawks however haveto be the best darn Community College team in the entire National Footbal Leauge !
Cheers Evelio....Marv ... Let me know what you experience with Kiff's tooling.
-
Evelio Mc Donald
- Sponsor
- Posts: 779
- Joined: Thu Feb 23, 2006 9:05 pm
- Location: Wimberley, Texas
Re: A bolt gun Revisited
I love it, great reply, just what I expected from you in a technical subject. So actually what you are saying, is that you are controlling the clearance between the bolt, and the action, by holding the clearance in the barrel counterbore, to maybe .001 over the bolt nose dia. ?????
The PTG tool would be held in the tailstock of the lathe, and as rigid as a reamer, again my biggest concerned is the .005 to .010 clearance between bolt body and action, in the Rem. actions, but as of this time, I am also looking at more precision actions like Hall, Bat, and Stillers where there is no practical play back and forth between the bolt, and the action. I am talking more benchrest accuracy rather than silhouette.
By the way, I never thought of you as an "illiterate SOB" just somebody with a guilty feelings thinking, that every body out there is out to get you. You know my friend,( if you allow me to call you that,) your attitude is your biggest enemy, not the rest of the guys out there, were in the West, East, North, South, or whatever.
Its 6.00 Pm in Houston, and I am ready for a good drink.
Chears, Evelio.
The PTG tool would be held in the tailstock of the lathe, and as rigid as a reamer, again my biggest concerned is the .005 to .010 clearance between bolt body and action, in the Rem. actions, but as of this time, I am also looking at more precision actions like Hall, Bat, and Stillers where there is no practical play back and forth between the bolt, and the action. I am talking more benchrest accuracy rather than silhouette.
By the way, I never thought of you as an "illiterate SOB" just somebody with a guilty feelings thinking, that every body out there is out to get you. You know my friend,( if you allow me to call you that,) your attitude is your biggest enemy, not the rest of the guys out there, were in the West, East, North, South, or whatever.
Its 6.00 Pm in Houston, and I am ready for a good drink.
Chears, Evelio.
Evelio
-
metalhead
- AA Poster
- Posts: 270
- Joined: Mon Nov 28, 2005 4:28 pm
- Location: Adna
Re: A bolt gun Revisited
Evelio...I have done more than one Anschutz trigger conversions on Stiller action. Bench rest quality, no darn way, but these were with the predator series. Perhaps they have their tolerance issues worked out. Back then, total heartburn for the guy doing the job.
My advice, hold the fit between the "bolt nose" and the counter bore on the barrel and you eliminate any play up front where the bolt slips into the barrel counterbore.
As far as my attitude, I never was very good at placating ignorant people trying to tell me all about what they know to be true in their own little minds. That's one thing you can expect to never change. And yes, you are more than welcome to call me a friend, though it might cause you, your own self some serious heartburn from the Marv Haters.
My advice, hold the fit between the "bolt nose" and the counter bore on the barrel and you eliminate any play up front where the bolt slips into the barrel counterbore.
As far as my attitude, I never was very good at placating ignorant people trying to tell me all about what they know to be true in their own little minds. That's one thing you can expect to never change. And yes, you are more than welcome to call me a friend, though it might cause you, your own self some serious heartburn from the Marv Haters.
-
BCloninger

- Master Poster

- Posts: 1331
- Joined: Mon Feb 15, 2010 11:22 am
- Location: Fort Smith, Arkansas
Re: A bolt gun Revisited
There's a rumor that technical gifts are often accompanied by character deficits - or so people have told me.
"You are never too old to set another goal or to dream a new dream."
- C.S. Lewis
- C.S. Lewis
-
Evelio Mc Donald
- Sponsor
- Posts: 779
- Joined: Thu Feb 23, 2006 9:05 pm
- Location: Wimberley, Texas
Re: A bolt gun Revisited
PLEASE TO ALL< NO F________ POSTS NOT RELATED TO THE SUBJECT, SPECIALLY STUPID ONES
Thanks.
Evelio.
Thanks.
Evelio.
Evelio
-
metalhead
- AA Poster
- Posts: 270
- Joined: Mon Nov 28, 2005 4:28 pm
- Location: Adna
Re: A bolt gun Revisited
Evelio....what did I just tell you about the Marv haters? They aint never going away. So liitle to offer and so much hate. 
-
Evelio Mc Donald
- Sponsor
- Posts: 779
- Joined: Thu Feb 23, 2006 9:05 pm
- Location: Wimberley, Texas
Re: A bolt gun Revisited
I really don't want to go there, but in your case is more like " so much to offer, and so much hate" why ????
Evelio.
I really want technical info. for my benefit, and any other reading this.
Thanks again.
Evelio.
I really want technical info. for my benefit, and any other reading this.
Thanks again.
Evelio
-
CZforlife

- Master Poster
- Posts: 1112
- Joined: Tue Feb 22, 2011 6:10 pm
- Location: Hollywood
Re: A bolt gun Revisited
Ahh, nobody's perfect. Very interesting article though! Thanks metalhead! 
Baby Huey
-
Evelio Mc Donald
- Sponsor
- Posts: 779
- Joined: Thu Feb 23, 2006 9:05 pm
- Location: Wimberley, Texas
Re: A bolt gun Revisited
Marv.
I posted a couple of other replies in the last 30 minutes but they did not showed up. Maybe I hit the wrong button. Your idea is great for the Rem. actions, but what about the BAT and Spillers actions with the cone bolt face, there is no guide into the chamber, as a matter of fact, they recomend about .010" clearance between the cones.
I am looking at benchrest guns capable of shooting a 5 shot group of .180" at 100 yds. or .250" at 200 yds.
What do you think now about the PTG tool, I know this actions are top of the line, and supposed to be perfect, but when everything is done separetly, there is always a chance for tolerance stact up.
Evelio.
I posted a couple of other replies in the last 30 minutes but they did not showed up. Maybe I hit the wrong button. Your idea is great for the Rem. actions, but what about the BAT and Spillers actions with the cone bolt face, there is no guide into the chamber, as a matter of fact, they recomend about .010" clearance between the cones.
I am looking at benchrest guns capable of shooting a 5 shot group of .180" at 100 yds. or .250" at 200 yds.
What do you think now about the PTG tool, I know this actions are top of the line, and supposed to be perfect, but when everything is done separetly, there is always a chance for tolerance stact up.
Evelio.
Evelio
-
metalhead
- AA Poster
- Posts: 270
- Joined: Mon Nov 28, 2005 4:28 pm
- Location: Adna
Re: A bolt gun Revisited
Evilio...I have not done that many rebarrels using actions with a coned bolt. No more than 25 I would guess so I might not be the most well informed person on this subject. I do know that I always fit the cone on the bolt nose to within .001 or less to the mating surface on the new barrel. Stolle Pandas and Kodiaks, BAT, Nesika, etc. How I did it was to first establish your reference cut on the barrel shank. This would be the surface used to measure chamber depth with the go gauge, thread the barrel shank to fit which ever action I was working with, then cut the chamber, and then begin to cut the appropriate cone angle on the barrel.
As I would get close, I would insert the bolt into the receiver and screw it onto the threaded barrel shank. When it came to a stop and would not screw in any farther, I would use some feeler gauges between the face of the receiver and the shoulder on the barrel shank to measure how much farther I had to go with the cone angle cut. Sneak up on it a little at a time and re-measure. In my opinion, no bench rest smith is ever going to leave .010 clearance between these surfaces and expect the project to deliver the level of accuracy you mentioned.
When you think about it, holding the fit between the cone on the bolt nose and the barrel shank real close will align these two parts quite nicely. Another thing to consider with an action like a BAT or a Panda is that there is virtually no play between the bolt body and the internal diameter of the action. The "Spillers" I have had here in my shop were way worse than any Remington I have ever worked on in regard to sloppy bolt body to internal receiver diameter fits.
To be honest, I have never done any Spiller rebarrels, just a few Anschutz trigger instalations. All of my Spiller jobs that I remember have invoved a dish rag to clean up the mess I had made. Sorry Pal, I just could not resist that one. Hope this answers your question....Marv
As I would get close, I would insert the bolt into the receiver and screw it onto the threaded barrel shank. When it came to a stop and would not screw in any farther, I would use some feeler gauges between the face of the receiver and the shoulder on the barrel shank to measure how much farther I had to go with the cone angle cut. Sneak up on it a little at a time and re-measure. In my opinion, no bench rest smith is ever going to leave .010 clearance between these surfaces and expect the project to deliver the level of accuracy you mentioned.
When you think about it, holding the fit between the cone on the bolt nose and the barrel shank real close will align these two parts quite nicely. Another thing to consider with an action like a BAT or a Panda is that there is virtually no play between the bolt body and the internal diameter of the action. The "Spillers" I have had here in my shop were way worse than any Remington I have ever worked on in regard to sloppy bolt body to internal receiver diameter fits.
To be honest, I have never done any Spiller rebarrels, just a few Anschutz trigger instalations. All of my Spiller jobs that I remember have invoved a dish rag to clean up the mess I had made. Sorry Pal, I just could not resist that one. Hope this answers your question....Marv
-
Evelio Mc Donald
- Sponsor
- Posts: 779
- Joined: Thu Feb 23, 2006 9:05 pm
- Location: Wimberley, Texas
Re: A bolt gun Revisited
You got me, how about Stillers !!!!
Man .001" clearance in a cone breach, sounds scary, it looks like any small trash in between will make it real hard or imposible to close the bolt. The few that I done, I go with around .005" clearance. You are also correct on the tight fit between the bolt and the action, on the BATS, and Stolle, they are perfect, and Spillers,I mean Stillers does have some models that are as tight, I think the Predators are probably the worse.
One of the top benchrest shooter in this area, which does all the work himself, insist on always touching off the face of his bolts, even though, all his actions are top of the line.
Evelio.
Man .001" clearance in a cone breach, sounds scary, it looks like any small trash in between will make it real hard or imposible to close the bolt. The few that I done, I go with around .005" clearance. You are also correct on the tight fit between the bolt and the action, on the BATS, and Stolle, they are perfect, and Spillers,I mean Stillers does have some models that are as tight, I think the Predators are probably the worse.
One of the top benchrest shooter in this area, which does all the work himself, insist on always touching off the face of his bolts, even though, all his actions are top of the line.
Evelio.
Evelio